Author Topic: My C10's Resurrection  (Read 32201 times)

Offline MetrickMetal

  • Full Member
  • ***
  • Posts: 117
  • Country: us
    • MetrickMetal Custom Motorcycle Parts
Re: My C10's Resurrection
« Reply #20 on: March 15, 2013, 01:32:00 PM »
Well I finally ordered up all of the parts to rebuild my carbs including new #120 main jets and a new petcock from Murph’s today, and I finished cleaning out the gas tank which looks great inside.

The tank didn’t have a lot of rust, but it had a lot of varnish inside. So removed the petcock and the fuel gauge sending unit and made up a couple of simple aluminum block off plates to seal up the openings, using the sending unit rubber seal along with a flat rubber seal I made for the petcock opening. I then bought a gallon of lacquer thinner from a local bulk supplier for about $4 and I poured a ½ gal of it in along with a bunch of steel BB’s and closed the gas cap and proceeded to shake the tank around for quite awhile, after which I drained the tank which removed quite a bit of the crap inside.
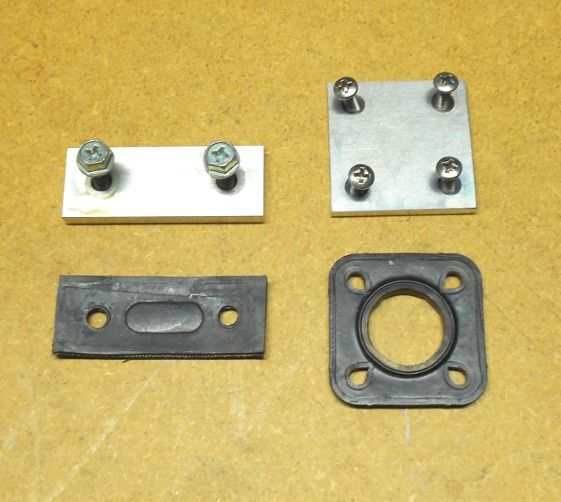


I then poured the rest of the lacquer thinner inside and repeated shaking the tank around for quite awhile, and then I drained the lacquer thinner out and used my long flexible magnet to reach in and remove all of the BB’s.

I then poured a 2 qt mixture of simple green and hot water inside the tank and swished it around well, then I removed the two block off plates and placed the tank on a large plastic pan I have and turned on the hose on and thoroughly flushed out the tank, and I rotated the tank around until I got all of the water drained out of it, and now it’s sitting outside in the sun with the cap opened up as well as the openings on the bottom of the tank, and it should dry out fairly quickly as were going to have a high of 85 today, and it’s already pretty warm outside.

Anyways the tank looks great inside, and soon as I get the new petcock it will be ready to go. I was going to buy a used petcock and a rebuild kit from Murph’s, but even with the cheapest petcocks I could find on eBay, after buying one and the rebuild kit I was within $13 of a brand new one from Murph’s, so I decided to just go with a brand new one.   

After I get the carbs rebuilt and back on and install the gas tank, I’ll buy a new battery and get it fired up. If everything looks good with the engine which I’m sure it will be, I’m going to spring for a set of stick coils and a new windshield, and then I need to rebuilt the forks to fix a leaky seal as well as inspecting and greasing the rear suspension linkage, then I can ride it around for a little while for a more thorough evaluation, and if everything looks good I’ll put new tires on it, and go from there.         
« Last Edit: March 16, 2013, 12:32:00 PM by MetrickMetal »
www.MetrickMetal.com custom motorcycle parts
Custom naked 07 Suzuki Bandit GSF1250S/AK7
In the process of resurrecting an 02 C10

Offline MetrickMetal

  • Full Member
  • ***
  • Posts: 117
  • Country: us
    • MetrickMetal Custom Motorcycle Parts
Re: My C10's Resurrection
« Reply #21 on: March 15, 2013, 01:33:29 PM »
Thanks everyone for the positive feedback.  ;)
« Last Edit: March 16, 2013, 07:24:06 AM by MetrickMetal »
www.MetrickMetal.com custom motorcycle parts
Custom naked 07 Suzuki Bandit GSF1250S/AK7
In the process of resurrecting an 02 C10

Offline MetrickMetal

  • Full Member
  • ***
  • Posts: 117
  • Country: us
    • MetrickMetal Custom Motorcycle Parts
Re: My C10's Resurrection
« Reply #22 on: March 16, 2013, 12:35:33 PM »
The tank was thoroughly dry this morning, so I poured about a half gal of old two stroke gas to which I added a little bit more motor oil to and poured it in the tank and swished it around and drained it out to leave a coating of oil on the inside of the tank, and the gas that came out looked good, so the tank is done outside of installing the new petcock which is on it's way.  :)
www.MetrickMetal.com custom motorcycle parts
Custom naked 07 Suzuki Bandit GSF1250S/AK7
In the process of resurrecting an 02 C10

Offline MAN OF BLUES

  • Arena
  • Sr. Member
  • ****
  • Posts: 2898
  • Country: 00
  • WHISKEY.Tango.Foxtrot.
Re: My C10's Resurrection
« Reply #23 on: March 17, 2013, 03:01:54 PM »
just a note of caution, having re-furbished a few tanks over the years...
using a volatile flashpoint cleaner like laquer thinner, mixed with steel b-b's and shaking a sealed tank is VERY risky...
I would not suggest that to anyone, as it could blow up should a spark occur.

My normal routine for cleaning a rusty tank consists of using a much safer flash point solvent, such as kerosene or mineral spirits, and an inert (non ferrous)  non sparking abrasive like aquarium gravel (the sharp natural stuff that around BB size). I have even used regular fine limestone gravel, which I washed repeatedly prior, and screened out to remove the fine stuff, leaving the coarser for use.
It all seems to come back out when you do the final washing and drying.

After all that, it would have been wise to use a coating, seeing as it is now bare, clean metal. POR-15 makes a great Zinc-phosphate protective rust conversion product, which is re-usable over and over. Its shown here:
http://www.por15.com/PREP-READY/productinfo/MRG/

46 YEARS OF KAW.....  47 years of DEVO..

Offline stevewfl

  • Arena
  • Hero Member
  • *****
  • Posts: 4268
  • Country: 00
Re: My C10's Resurrection
« Reply #24 on: March 17, 2013, 07:06:21 PM »
Awesome restoration thread. 

+1 I've had great luck with the POR15 products in some horrid motorcycle tanks.


That product was instrumental in me bringing this bike back to life


And then run on Homestead-Miami track


“The World is a book, and those who do not travel read only a page.” St. Augustine

Offline MAN OF BLUES

  • Arena
  • Sr. Member
  • ****
  • Posts: 2898
  • Country: 00
  • WHISKEY.Tango.Foxtrot.
Re: My C10's Resurrection
« Reply #25 on: March 17, 2013, 07:39:32 PM »
is that the one you wrecked? I vaguely recall some photos posted of a badly crumpled machine...

46 YEARS OF KAW.....  47 years of DEVO..

Offline MetrickMetal

  • Full Member
  • ***
  • Posts: 117
  • Country: us
    • MetrickMetal Custom Motorcycle Parts
Re: My C10's Resurrection
« Reply #26 on: March 18, 2013, 06:27:25 AM »
just a note of caution, having re-furbished a few tanks over the years...
using a volatile flashpoint cleaner like laquer thinner, mixed with steel b-b's and shaking a sealed tank is VERY risky...
I would not suggest that to anyone, as it could blow up should a spark occur.

My normal routine for cleaning a rusty tank consists of using a much safer flash point solvent, such as kerosene or mineral spirits, and an inert (non ferrous)  non sparking abrasive like aquarium gravel (the sharp natural stuff that around BB size). I have even used regular fine limestone gravel, which I washed repeatedly prior, and screened out to remove the fine stuff, leaving the coarser for use.
It all seems to come back out when you do the final washing and drying.

After all that, it would have been wise to use a coating, seeing as it is now bare, clean metal. POR-15 makes a great Zinc-phosphate protective rust conversion product, which is re-usable over and over. Its shown here:
http://www.por15.com/PREP-READY/productinfo/MRG/

Thanks for your input, and yes lacquer thinner is flammable, but I personally think It's probably impossible to ignite it sloshing it around in a tank with BB's that are suspended in a it, but I could be wrong, but lacquer thinner does work great at removing varnish. It's funny that you mentioned por15 which I have used before as I was thinking about using it on this tank also even before I used the lacquer thinner to remove all of the varnish.

The reason I used steel BB's is because of prior experience trying to get other types of not metallic media out of a gas tank, and I'm glad I went with steel BB's as due to the C10's tank design they will not come out of any of the openings on the tank on their own period, and the only way to get them out was using a long flexible magnet. So if I were to have put something non metallic in the tank like small stones I would have never gotten them out.  ;)   
 
www.MetrickMetal.com custom motorcycle parts
Custom naked 07 Suzuki Bandit GSF1250S/AK7
In the process of resurrecting an 02 C10

Offline MetrickMetal

  • Full Member
  • ***
  • Posts: 117
  • Country: us
    • MetrickMetal Custom Motorcycle Parts
Re: My C10's Resurrection
« Reply #27 on: April 15, 2013, 02:14:35 PM »
Well I'm backworking on the C10, and I just finished assembling the carbs after a good cleaning, new main jets, needles,float bowl o-rings, setting the float level, new air mixture screw o-rings and new fuel rail o-rings. I used the 17mm float setting from the service manual, and two floats were spot on, and two were out a little over 1.5mm. I though I remembered reading about another float setting here but haven't been able to find it. 

They'll go back in this week and then I need to order a new battery and get it started up.  :)   
www.MetrickMetal.com custom motorcycle parts
Custom naked 07 Suzuki Bandit GSF1250S/AK7
In the process of resurrecting an 02 C10

Offline RFH87_Connie

  • Arena
  • Full Member
  • ***
  • Posts: 944
  • Country: us
Re: My C10's Resurrection
« Reply #28 on: April 15, 2013, 02:22:29 PM »
Search around for the float setting method that uses clear tubing.  That is the best way to get them set exact right at the bowl parting line.  Its done while they are still on the workbench.  You can find it, so I won't explain it again.  Here are some pix to get you thinking.
“I can truly say I had rather be at home at Mount Vernon with a friend or two about me, than to be attended at the seat of government by the officers of State and the representatives of every power of Europe.” - George Washington

Offline MetrickMetal

  • Full Member
  • ***
  • Posts: 117
  • Country: us
    • MetrickMetal Custom Motorcycle Parts
Re: My C10's Resurrection
« Reply #29 on: April 17, 2013, 07:42:37 AM »
Search around for the float setting method that uses clear tubing.  That is the best way to get them set exact right at the bowl parting line.  Its done while they are still on the workbench.  You can find it, so I won't explain it again.  Here are some pix to get you thinking.

Thanks, and I might try this to double check the float adjustments, and this procedure is also decribed in the factory service manual.

I stopped by the metric bolt supplier I buy my fasteners from yesterday and picked up some M4 S/S socket head screws and lock washers to replace all of the float bowl screws as well as the M6 and M5 screws for the two carb stay plates. I also powder coated the carb stay plate semi gloss black which looks really good with the S/S screws.  :)
www.MetrickMetal.com custom motorcycle parts
Custom naked 07 Suzuki Bandit GSF1250S/AK7
In the process of resurrecting an 02 C10

Offline MetrickMetal

  • Full Member
  • ***
  • Posts: 117
  • Country: us
    • MetrickMetal Custom Motorcycle Parts
Re: My C10's Resurrection
« Reply #30 on: April 19, 2013, 12:39:20 PM »
I checked the valve clearances this morning which is one of thing I wanted to perform before I attempt to start the engine up, and I'm glad I did as they were all so tight that I could not get the fellers gauges between any of the valves, and they all required about close to 1/2 turn out to get the gauges to go in.

All of the locknuts and adjuster screws all had the red factory QC marker paint on them, and it looked like maybe they had ever had a wrench put on them. One thing I quickly found out to make the valve cover come off easily is to loosen the two M6 screws that attach the cooling system manifold to the back of the head and pull it back about 3/8". After I pulled the manifold out a little, I squirted some silicone spray around each of the round sections of the manifold that fit into the head to help lube up the o-rings, and the manifold pushed easily back into the ports on the head. 

One thing I did notice is that the exhaust and intake cam lobes on cylinders 2&3 both have some light spalling and pitting on them, so I’ll run it with them for awhile until I make sure the engine is going to be ok, then I’ll pick up a set of the torque cams from SISF.  :) 
www.MetrickMetal.com custom motorcycle parts
Custom naked 07 Suzuki Bandit GSF1250S/AK7
In the process of resurrecting an 02 C10

Offline Two Skies

  • Arena
  • Full Member
  • ***
  • Posts: 213
  • Country: 00
  • Road? What road?!?
Re: My C10's Resurrection
« Reply #31 on: April 19, 2013, 03:26:54 PM »
Just a quick FYI, pretty much all of the 'stock' cams on Connies are prone to pitting, so keep this in mind.  Most of us have some degree of pitting with the stock cams after some miles.  So if yours are just lightly pitted, this shouldn't really be considered a major issue yet (keep an eye on it, though), although it makes a great excuse to get Steve's cams. 

And everyone wants better performing cams, right?  It's on my to do list this year...
 ;D

If they are starting to get a lot of deeper pitting and such, though, well of course it's time.
2006 w/50,000+ miles and a few bruises.

MCL Fork Brace & Handlebar Risers.  Bergmen Quick Release Tank Kit, Pilot GT Front/Avon Venom Rear tire.  Trunk w/spoiler.  NGK DR8EIX plugs.  Piece of foam in airbox.  Beads on seat.  Bafflectomized.  Murphs Kneesavers & Fuse Block.  Cee Bailey Winscreen w/vent.  Heated grips.  'Custom' mirrors.

Offline MetrickMetal

  • Full Member
  • ***
  • Posts: 117
  • Country: us
    • MetrickMetal Custom Motorcycle Parts
Re: My C10's Resurrection
« Reply #32 on: April 24, 2013, 08:48:10 AM »
Search around for the float setting method that uses clear tubing.  That is the best way to get them set exact right at the bowl parting line.  Its done while they are still on the workbench.  You can find it, so I won't explain it again.  Here are some pix to get you thinking.

I was hoping to see if there were any threads on here with any tips on setting the float bowl fuel level using tubing to gauge the fuel level height, but I've spent more than an hour doing searches here using every conceivable combination of wording for threads on setting the fuel level, including the search titles that you even recommended in another thread, which were float level, float height, and I got nothing, except being directed back to your thread saying to do a search.

So instead of wasting any more time in a futile search on the subject, I’m going to go ahead and buy the level setting gauge from Kawasaki and set up my carbs on my bench with an auxiliary fuel tank I have and set the fuel level using the procedure described in the factory service manual.   
 
www.MetrickMetal.com custom motorcycle parts
Custom naked 07 Suzuki Bandit GSF1250S/AK7
In the process of resurrecting an 02 C10

Offline RFH87_Connie

  • Arena
  • Full Member
  • ***
  • Posts: 944
  • Country: us
Re: My C10's Resurrection
« Reply #33 on: April 24, 2013, 12:22:17 PM »
Interesting.  Maybe all this stuff was in the old forum before it crashed.  I'll try to explain what I do, which would be pretty much the same as others do.  What you are trying to do is set the fuel level right at the middle of the bowl to body parting line, and make them all equal.  Treat this task as if it was surgery, and keep it as clean as possible.

You will need about a foot or two of clean, clear tubing that will slip on (and stay on) the carb drain nipples.  I have an old battery vent line that is perfect, although some fish tank air lines work too.

You will need a way to suspend the carbs so you can take the bowls off to bend the tab/tang that each float needle is attached too.  See my earlier picture.  Others have made stands from PVC you can search for.  This task can also be done on the bike, put is a real pain and I would not recommend that.

You will also need a fuel supply (or low-volatile mineral spirit - kerosene) above the carbs to feed them as you remove and reinstall each bowl until you get the desired adjustment.  Work them one at a time.  KEEP IN MIND THIS IS A FLAMABLE TASK you are performing so take appropriate measures.

And finally, a nice fresh, new, clean piece of fuel line.

Place a fuel-safe drain pan below the carb area to capture the spilling fluid.

So what do you do?  Hook up the fuel supply to the carbs with the supply line.  Attach the clear tubing to carb #1's drain nipple.  Put the petcock on PRIme.  Wait a few seconds, then with the tubing in kind of a "J" shape with the outlet above the carb top, open the drain screw to let the fuel flow into the tube.  Hold the tubing very still.  See where it stops in relationship to the parting line.  Carefully lower the tubing an inch to see if it fills to the same level.  Do not pull the tubing upward as this pushes fuel back into the carb and gives a false high reading - only go downward and let it fill as you do.  Turn off the petcock.  Close the drain screw.  If adjustment is needed, take the bowl off and bend the tab the get the desired level.  Repeat until satisfied.

Move to carb #2 and do it again, then do the others.

I've read from others (thanks Rich - COG 5977!) that to static bench synch the carbs nicely, make them all equal with the linkage adjustment screws, and then set them, as a group, so you only see HALF of the front-most tiny hole uncovered by the butterfly plates in the venturi opening.

Make sure you have tightened all bowl screws.

Make sure (again) you have tightened all bowl drain screws.  Not too tight, as a few people have reported splitting the hole open.

Clear as mud?  I think I covered it guys, let me know what I missed or incorrectly stated.  I'm saving this when it's done for future use.
“I can truly say I had rather be at home at Mount Vernon with a friend or two about me, than to be attended at the seat of government by the officers of State and the representatives of every power of Europe.” - George Washington

Offline MetrickMetal

  • Full Member
  • ***
  • Posts: 117
  • Country: us
    • MetrickMetal Custom Motorcycle Parts
Re: My C10's Resurrection
« Reply #34 on: April 24, 2013, 12:49:11 PM »
Thanks so much!

Well I'll save the $20 buck or so for the factory setting gauge, and since I have to order some stuff for my shop from McMaster Carr this week, I'll order up a piece of clear Tygon fuel tubing to use.  :)

« Last Edit: April 25, 2013, 07:07:16 AM by MetrickMetal »
www.MetrickMetal.com custom motorcycle parts
Custom naked 07 Suzuki Bandit GSF1250S/AK7
In the process of resurrecting an 02 C10

Offline MetrickMetal

  • Full Member
  • ***
  • Posts: 117
  • Country: us
    • MetrickMetal Custom Motorcycle Parts
Re: My C10's Resurrection
« Reply #35 on: September 01, 2013, 07:42:13 AM »
Hi everyone.

I haven’t been on here for awhile or working on the Connie since the last stuff I posted up on about rebuilding the carbs on it because I’ve just been so busy with my business and doing work on my house getting it ready to sell.

I had bought a set of Denso stick coils off of eBay for $30 shipped that appeared to be like brand new, as well as a coil connector harness off of a Honda CBR600RR that I also got off eBay for $16 shipped that I cut up to use for making up the wiring loom for the coils.


I made up a bread board out of piece of ¼” masonite and a couple short pieces of 2x4’s with holes in the masonite to hold the coils on the same centerline as on the head for making up the wiring loom, which worked out great, and I’m pleased with how the loom came out.


Now I plan to perform the liquid level check on the rebuilt carbs so I can get them installed and work at getting the engine started up, as my goal is to get the bike up and running and ready to ride by the end of the year or sooner. Once I get the engine sorted out and running well and am confident that it’s going to be ok, and then I am going to proceed with rebuilding the forks and servicing the stem bearings, and then a complete servicing of the rear suspension.

I need to get a new battery for my 07 Bandit 1250 as it’s the original battery, so I’m going to use the battery out of it for awhile in the Connie to use to get it started up and running as it’s close to the size of the Connie’s battery and will fit in the battery box, then I will buy a new battery for the Connie as well before I start to do any serious riding on it.  :)   
« Last Edit: September 03, 2013, 02:22:44 PM by MetrickMetal »
www.MetrickMetal.com custom motorcycle parts
Custom naked 07 Suzuki Bandit GSF1250S/AK7
In the process of resurrecting an 02 C10

Offline IraB

  • Jr. Member
  • **
  • Posts: 73
  • Country: us
Re: My C10's Resurrection
« Reply #36 on: September 01, 2013, 08:35:10 AM »
Wow!

I'm a newbedo here and just finished reading through the thread.  You do very nice, clean work.

Also got a deal that was too good to refuse on a Connie (2003 with 10,000 miles) and am already in love with the bike.  Have done most of the overdue maintenance, am pondering mods/improvements and picking your brains via this thread.  :D
Already working on plates for the valve cover and stick coils are on the to do list.  Should make cover removal for future valve adjustments less of a hassle.
Installing  overflow tubes on the carbs and am curious if you are also planning to do so?  It would be a bummer to see so much fine handy work undone by a bent rod.


Interestingly, I too encountered valves that had obviously never been adjusted even though a shop had billed the previous owner for doing so. Having turned wrenches professionally few things **** me off more than crooked mechanics.


Offline T Cro ®

  • Administrator
  • Sr. Member
  • *****
  • Posts: 1743
  • Country: us
Re: My C10's Resurrection
« Reply #37 on: September 01, 2013, 09:31:07 AM »
... Interestingly, I too encountered valves that had obviously never been adjusted even though a shop had billed the previous owner for doing so. Having turned wrenches professionally few things **** me off more than crooked mechanics...


How so obvious?
Tony P. Crochet
(SOLD) 01 Concours Winner of COG Most Modified in 2010

Offline IraB

  • Jr. Member
  • **
  • Posts: 73
  • Country: us
Re: My C10's Resurrection
« Reply #38 on: September 01, 2013, 10:50:08 AM »
If you have worked on a lot of engines and machinery you can usually spot a nut, bolt, gasket surface, cover screws ect.  that have never been disturbed by wrench or screwdriver.
The owner was billed for a full tune up (about $650) and the bike only ridden about 80 clear weather miles before I got it.

In this case, none of the items that must be removed to facilitate removal of the valve cover seem to have ever been removed, the side cover (pulse cover) and valve cover had original sealant dabs where the factory applied it with no trace of it being cleaned off and or replaced, spark plugs were factory (new ones had been billed) and the air cleaner element was gummy and filthy.  All items mentioned had a nice patina of dust and grime appropriate to the age of the bike.  The valves were very much in need of adjustment.

In spite of all this the bike didn't run half bad but now it purrs like a kitten.  :)

Offline T Cro ®

  • Administrator
  • Sr. Member
  • *****
  • Posts: 1743
  • Country: us
Re: My C10's Resurrection
« Reply #39 on: September 01, 2013, 11:34:36 AM »
If you have worked on a lot of engines and machinery you can usually spot a nut, bolt, gasket surface, cover screws ect.  that have never been disturbed by wrench or screwdriver.
The owner was billed for a full tune up (about $650) and the bike only ridden about 80 clear weather miles before I got it.

In this case, none of the items that must be removed to facilitate removal of the valve cover seem to have ever been removed, the side cover (pulse cover) and valve cover had original sealant dabs where the factory applied it with no trace of it being cleaned off and or replaced, spark plugs were factory (new ones had been billed) and the air cleaner element was gummy and filthy.  All items mentioned had a nice patina of dust and grime appropriate to the age of the bike.  The valves were very much in need of adjustment.

In spite of all this the bike didn't run half bad but now it purrs like a kitten.  :)

Have been spinning wrenches for 30 plus years including the m/c industry and would have never even contemplated charging the customer for services not rendered.... BTW the pulse cover does not NEED to be removed to properly set valves; mine as only been off once and it was not to set valves...
Tony P. Crochet
(SOLD) 01 Concours Winner of COG Most Modified in 2010